MIDI ORGAN with the GINO-MIDI Interface
On the internet you can find several software-packages that enables you to use your computer as an electronic organ. Soundcards have improved dramatically and the Personal Computers are much faster then before. Constructing, designing, and building the sounds in digital instruments are taking place on the computer also. Even the most expensive digital organs are microprocessor-based. It is a logical step to build an organ with the computer also. The PC is the heart of the instrument, and the manuals and pedals and switches are the means to play this instrument, just like a digital organ. Of course you need an interface to connect the manuals and pedals and stop-switches to the computer. But once you have all the hardware, built a console, then you have the means to play the instrument.
Now you will probably scratch your head and think: This sounds great, but how does it work?
To answer this question, I have to ask this first:
What is needed to create a computer-organ? Here is our shopping-list.
- a Personal Computer
- a soundcard with MIDI or Game port-connector (joystick), or a USB to MIDI interface.
- a set of speakers or headphones that has to be connected to the sound card
- a MIDI keyboard or manual
- a game port to MIDI cable or a MIDI to MIDI cable and a MIDI manual or keyboard
- software like J-Organ, MyOrgan, Toccata or GenPo or Hauptwerk
- soundfonts
- a sample-set in the case that you use Hauptwerk.
Well, we have a lot of ingredients to make our organ.
The main part of our shopping list we already have at home. We have a computer, otherwise you could not read this website (unless your kind friend printed this page for you) . Most computers these days have onboard sound. If not, one can buy a soundcard that will perform really well. The low-end soundcards with 5.1 sound are already available for less then € 25. Most of the time you will also have a set of small speakers, or even use the speakers of your monitor. It is impossible to imitate the Notre Dame cathedral with these speakers. But for experimenting they will do. Later we can hook up an amplifier with a set of really good speakers.
Now we need a MIDI manual or keyboard. And of course a cable for the connection between the keyboards and the computer. Most computer-shops or music stores will have them. Sometimes these cables are hard to find, or very expensive. If you are not afraid to use a soldering iron then you can create such a cable yourself. If you read further then you can find the schematics that I drawed for making such a cable. The keyboard can be a simple 5-octave (61 note) keyboard. Of course a 4-octave keyboard will do also, but 5 octave is preferred. This keyboard should have a MIDI-out connector. Of course you can also use a midi-master keyboard or build your own manual-stack (with 1 or more manuals) as described on this site. Now we will define : Midi-keyboard: It is a keyboard that has contacts under the keys, and a MIDI interface, but does NOT produce sounds.
DIAGRAM
This diagram shows a setup for a complete organ with 2 manuals (a keyboard stack), pedals and stop-switches.

What you see here are the stop-control switches, Manual 2, Manual 1, and the pedal.
The stop-control switches are being red by the GINO-MIDI Interface through a diode-matrix and each diode-matrix is being scanned by a decoder which sends the signals (pressed keys, selected stops etc) to the GINO-MIDI Interface through a system of chained flat-cable.
All of these decoders are chained (linked) through a flat-cable, that finally ends at the GINO-MIDI Interface. We call this the GINO BUS.
The GINO-MIDI Interface is the main circuit, the brain of our system. This main-circuit contains a fast microprocessor. This circuit is so fast that it can scan almost simultaneously the manuals (keyboards), stop-switches, and pedal, and converts these data to MIDI-signals that are sent trough 1 MIDI cable only to the MIDI or soundcard.
If you click on the links below then you will arrive on the page where you can find the schematics , photo’s and PCB’s for the GINO-MIDI Interface. You find here also the schematics for the decoder for each division (manual, stop-switches and pedal). For each division you need a matrix with a decoder
Since each matrix consists of a group of 8 diodes (1 diode per key or switch) and a decoder can decode (read) 8 groups of 8 diodes, every decoder can then read maximum 64 keys ( 8 x 8 ). Since a 5-octave manual only has 61 keys, we have enough capacity. Also the pedal decoder has the ability to decode 64 keys, but since only 32 keys maximal are used for the pedal, we have enough capacity.
You can connect up to 64 stop-switches to the matrix for the stops.
One thing that is essential for our project is the software that can translate the MIDI-messages to organ-sounds. For this purpose several programs are available. Most of these you can download and they are freeware. For Windows we have for example jOrgan (Java based) and several soundfonts are freeware also. Hauptwerk is a commercial product and has a demo-version available but it does not support soundfonts, but large sample-sets where each pipe is separately recorded. Besides, you also have the freeware GrandOrgue.
There is a big difference between jOrgan, Hauptwerk and GrandOrgue. jOrgan is soundfont-based, while Hauptwerk and GrandOrgue are sample-based. Soundfonts are based on recreating complete stops from several recorded notes from a pipe-organ. (same principle as a digital organs). The Hauptwerk family is sample-based. The sample sets are individually recorded organ pipes, one by one, over the whole keyboard and pedal. An other disadvantage of Soundfont-based software is that it mostly requires a Creative Labs soundcard (SoundBlaster etc) because the samples are stored in so called “banks”. (Most newer Creative soundcards and motherboards don’t have a game-midi port anymore). I prefer JOrgan because of it’s flexibility in configuration and experimenting and it is transparent software. Of course it takes also a while before you know all the ins and outs of the software. In my opinion in Hauptwerk and GrandOrgue the configuration is not so easy and flexible as in JOrgan.
This kind of software is the heart of the computer-organ. For example, in JOrgan you start by building up a console on your computer. The stop switches etc are placed on your screen. Below you find an example of how it looks.

The next step is to make JOrgan generate the sounds and make them available to the speakers. This is where the Soundfonts come in. A soundfont pack is in fact a bundle of sounds files of recorded and recreated stops. Of course there are really nice, and less nice samples. On several websites you can download freeware Soundfont packs. Other sites offer soundfonts that are commercial and you have to pay for the samples.
The next step is to load the Soundfont Pack in the memory of your soundcard.. Now you have to associate the organ-stops with the virtual console that you built up in JOrgan. Now you are ready for your first performance as an organ-player. It sounds easier then it is in real, but this is just an outline. Most soundcards and software have a kind of user-manual or instructions. And if you have a Creative Labs soundcard (SoundBlaster), then you can use Vienna or the Soundfont manager to select the banks. The soundfont software is more easy to understand and to use.
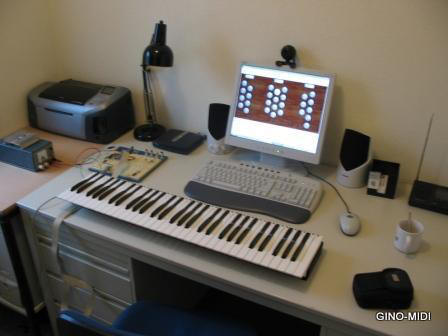
Here you see a test-setup. You see a manual (keyboard) that is connected to the GINO-MIDI Interface by the flatcable. This version was created on a piece of Vero-Board.
The GINO-MIDI interface is connected to the computer by a MIDI-cable.
On the screen you see the console of jOrgan with all the stops that I used for my first digital organ.
Now you are ready to play and amaze your audience with your first concert.
Conclusion
These days you can create a wonderful sounding digital organ with your computer, a low budget and a little extra hardware and software.